The Wood Duck is one of North Americas most colorful waterfowl, its scientific name of (Aix Sponsa) translates into “water bird in bridal dress“. These beautiful bright colored ducks nest in old growth timber found along river bottoms, beaver ponds and marsh lands. They like to nest in natural tree cavities and abandoned wood pecker holes, with in close access to water to brood their young.
 Nesting heights can range from near ground level up to 65 plus feet. These cavities typically have an opening hole of 4 inches and an inside dimension of 6 to 8 inches by 24 inches deep. Females lay between 7 to 15 white tanned eggs and incubation takes 30 days. The first artificial nesting boxes where developed in the 1930`s due to loss of habitat as an attempt to boost populations, over the years many plans and styles of building nesting boxes have evolved.
[Tweet “The Wood Duck is one of North Americas most colorful waterfowl.”]
Okay let’s get down to building this project! Almost every plan I have seen calls for using cedar due to its ability to with stand the environment and insects, but pine is also acceptable. The nesting box plans I use can be found here so you can follow along and build your own. One box will use 10.5 linear board feet of ¾“ thick by 9 1/4“ wide board, rough on one side (which will be the inside of the box). The tools needed will be: hand saw or chop saw (power miter box), drill with a half inch bit, jig saw, screw driver, sandpaper, pencil and straight edge. Estimated time for cutting and assembling one complete box is under a half hour. This project is also great for getting the kids involved in conservation activities and understanding habitats and land stewardship.
Step 1 – measure mark and cut out the 6 main pieces of the box and label them.
Back – 9.25 x 31“ lg.
Front – 9.25 x 23“ lg.
Side – 9.25 x 23.5“ lg
Door – 9.25 x 23.5“ lg
Roof – 9.25 x 14“ lg
Floor – 9.25 x 7.75“ lg
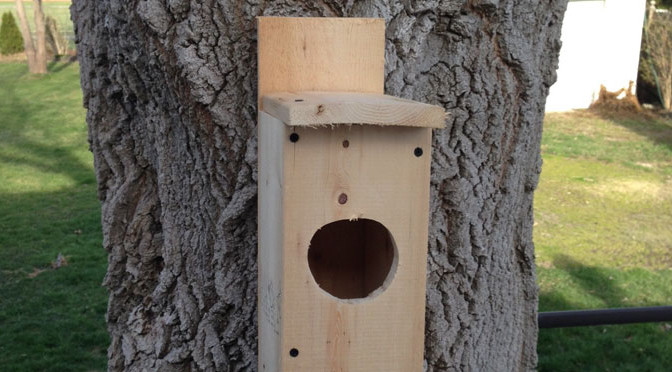
 Step 2 – on the piece marked front, measure and mark the entrance hole (oval) 4.5“ wide x 3.5“ tall approximately 3.25“ down from the top of the piece. At this time, on the inside surface of the board make horizontal cuts ¼“ deep below the entrance hole creating toe holds (ladder effect) to assist the hatchlings in exiting the box. (insert picture woodduck 2)
Step 3 – cutting out the entrance hole – use the drill to make a starting hole inside the oval entrance hole you marked out in the previous step. Then use the jig saw to remove the rest of the oval material finishing the entrance hole.
Step 4 – using the drill with the ½“ bit, drill 5 drainage holes in the piece labeled floor; this will help keep the nesting materials as dry as possible for the hatchlings.
Step 5 – start assembling the box – attach the side to the back, centered along the edge (should be 3.75“ from the top of the back) using 4 screws from the back side.
Step 6 – attach the Floor to the side using 2 screws and the back using 2 screws.
Step 7 – attach the Front using 6 screws (4 for the side and 2 for the floor)
Step 8 – using sand paper or a file, round the top outside edge of the piece marked door. This will allow the door side of the box to hinge open for clean out used materials every fall. Attach the door with 2 screws at the top (one through the back and one through the front) These 2 screws make the hinge. Use 1 nail or screw at the bottom front corner to pin the door closed for the nesting season. (insert picture woodduck 3)
Step 9 – attach the roof using 4 screws from the top and 3 from the back, being careful not to screw the roof to the clean out door side.
 The box can now be filled with wood shaving approximately 4 to 6 inches of depth but do not use saw dust it can stick to ducklings and suffocate them.
[Tweet “Place your new nesting box close to the water…”]
Placement of your new nesting box should be close to water with the entrance facing the water. This approach will give the hatchlings the best chance of making it to the water without predator pressure. Speaking of predators there are a couple ways you can help prevent predators from raiding the nesting box and stealing eggs. You can apply tin, or plastic to the tree below the nest to make it slippery for racoons and opossums to climb over, but that looks messy and trashy, after all we are trying to improve the habitat not make it look like a landfill. I recommend mounting your box to a galvanized pipe or T-rod and for extra protection I try to place these pipes in the water’s edge so the box is actually over the water with the entrance hole facing out into an open area.
I hope this has motivated you to spend a couple hours building your own boxes and improving the nesting grounds of your local favorite honey hole, until next time, get outdoors it’s a great place to be!
~
Thanks for reading! If you enjoyed this post please share it with the world!
Don’t forget you can read more articles from Jason Maure’s blog “The Canadian Outdoorsman” here and don’t forget to like us on Facebook.
If you’d like to get immediate email notifications when a new article, contest or show is posted; enter your email address in the sign up box on the left.
Discover more from The HuntFishTravel Show
Subscribe to get the latest posts sent to your email.
Good topic. We have some new wood duck boxes in the woods near our house. Some of our local Cub Scouts built them and put them up. I’m looking forward to watching for them to get used.
This is a great project to get kids involved with, just watch the power tools.