The advances in tree stands and hunting blinds have made leaps and bounds the past couple decades, but so has the investment people feel they need to make. While I will not argue the fact that these innovations have made hunting easier and more comfortable, my personal style of hunting finds it unnecessary.
I hunt many different lands, in many different parts of my home state. If I were to add up all the acreage that I cover on any given season, I would have to put that number in the range of about 5000 acres. Some of these acres are on private, but most is public. Here in Wisconsin, you are not allowed to leave stands in the tree longer than the day you hunt. Sometimes that requires strapping a climber to my back and hoofing it almost a half mile through some of the thickest, most difficult Midwest terrain imaginable.
One of the most significant drawbacks to this is the fact that it’s almost impossible to do so quietly. While stumbling through the dark, it is hard to imagine that anything out there did not hear you coming, and every deer in the area is probably running for the hills by the time you get to you stand location.
Back when I first began hunting, all I had for equipment was my bow, my camo, and maybe a call or two. I had to learn the ways of the hunters before tree stands were even legal to use. As I scouted the woods, I could make out the relics of a bygone era.
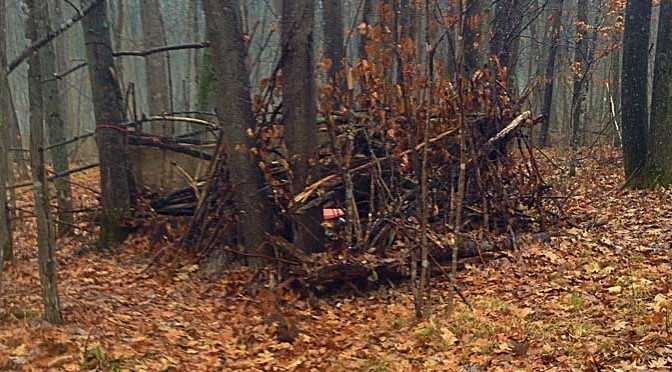
Brush blinds.
I still use this tactic in about 90% of my hunts. Currently I have dozens scattered across the Wisconsin landscape. Perfectly legal to construct on public lands, the variety of options will allow me the luxury of being mobile, and conceal myself rather well.
I am sure we have all heard that a popup blind needs to be brushed in so deer do not notice them. I have used them with great success but also had numerous occasions where the deer, despite being well concealed, would detect my blind. It is something new. Imagine someone setting one up in your back yard. Do you think you wouldn’t notice it? Of course you would.
Sure building a brush blind will not go unnoticed by a deer, but the difference is, that brush blind will now be there for years to come. It may spook them for a day or two, but they will adjust and become rather comfortable with its presents.
 The biggest advantage to a brush blind is stealth. No more lugging around a blind or tree stand on your back, bending, and breaking every branch that you come into contact with. It makes it easier to quickly and quietly, sneak into that big buck’s bedroom.
You can also build many of them, giving you a choice on stand locations depending on weather conditions, or deer activity. As I stated earlier, I have dozens of these that I maintain throughout the season. If I’m not having any luck in one area, or the conditions are not right, I have the choice to move and know I have a blind already waiting for me.
With a good days work, constructing a ground blind is a snap. Here is a step-by-step tutorial on how I build mine.
Step 1: Scout your location
You will want to find a spot with good deer sign just like you would any stand location. I personally like to find a large fallen tree, preferably one that is right next to a large standing tree. This greatly decreases the amount of work you will need to do to build it. Having a large fallen tree will act as one of the walls of your blind and makes a very nice, stable gun rest. It also is something that has already been there and the deer are used to seeing it. Having a large standing tree next to it offers both an anchor point for your other walls, and also adds more concealment to your back.
Step 2: Clear the area of sticks, shrubs, leaves and anything else, leaving the area with as much bare ground as possible. Level out any humps. Measure out an area that will allow you to not only sit comfortably, but will also fit your gear. Some of my blinds have been as big as a 10’x10′ area to accommodate myself and a friend along with camera equipment for when we are filming our hunts. Others are as small as a 5’x5′ area. So think ahead as to what your expectations are.
 Step 3: Gather up any fallen branches and logs in the immediate area surrounding your blind. This is for a couple different reasons. It clears up any debris and obstructions around you and helps create shooting lanes. Clearing the debris will also make it quieter when you are approaching your blind. Choose fallen logs and branches that are as big as you can possibly move. The bigger the better. Sometimes it helps to have a buddy along to help move some of the bigger, heavier pieces. I like to try to find wood that has a diameter of about 4-5 inches and are 10-20 feet in length, but don’t hesitate to grab bigger if possible. Try not to cut down any live trees. Especially if hunting public land as this is more than likely illegal.
Step 4: interweave the branches and fallen trees to form walls. Always start with your biggest thickest pieces first for your base. If you start with the smaller pieces, the weight of the bigger trees on top will slowly crush the smaller branches and you will lose the height of your walls, decreasing the blind’s life span. Starting at the bottom work your way around the blind. Do not start by assembling one wall first and the moving onto another. This locks the walls into each other making it much more sturdy and durable. Place a chair or stool into the stand where you will most likely be sitting and keep stacking the wood until it is high enough that only your head rises above the structure. This insures that you will have maximum concealment. If you stop when the blind only reaches your waist while sitting, you will be exposed to a deer’s uncanny eyesight. Make sure you have left a gap in the wall to use as an entrance and exit for the blind. I like to make my entrance alongside the standing tree I have placed the blind against, but it doesn’t matter so long as you have one. You do not want to have to climb over your walls to get in. That makes noise, could potentially break some of the logs and ruins your wall. Try to make your entrance so it is on the same side of the blind you are most likely to approach it from.
Step 5: fill in any gaps you may have in your wall that allow deer to see into your blind. I like to do this by gathering moss from the forest floor when I can. Almost like chinking a log home, I will take the moss and stuff it into any holes and gaps I find. Moss is perfect for this because it can still stay alive and fill those voids for years to come. It also comes in handy as a wind block, possibly keeping you that much warmer on those cold days.
Brush blinds are only limited by your imagination. Size, shape, and functionality will always vary and no two blinds will ever be the same. You may need to add a little bit every year as the wood breaks down, but when properly constructed, they can last through the generations. I have blinds that I have used for decades and still produce a quality hunting experience. They can be useful in almost any terrain type around the world, as long as materials are available.
I hope you found this article useful as a tactic for your next hunting season. Whether it is turkey, deer, bear, or moose, it is definitely my go to tactic. Good luck and happy hunting everyone!