The use of topographical maps is one of the most useful tools you can use in search of big game. Knowing how to read and understand topo maps is a skill that has taken me quite a few years to fully understand. I will try and explain some of the things I have learned throughout the years.
First let’s obtain a map of the area that you plan on hunting. There are several companies that you can use to order maps from. I order the majority of my maps from Mytopo.com. This is a great company were you can order custom maps. I highly recommend looking into this company. There are several other companies that you could use also. This is just the company that I have used. Just do a Google search and you will find them. Generally I order a 7.5 minute map which means it will show approximately a 40 to 70 square mile area. This is more than enough area coverage for the places I plan to hunt.
Now that you have your map, what does it all mean? If you didn’t know any better it is just a piece of paper with a bunch of line on it. But the more you start to use and understand topo maps, the more you will realize the wealth of information laid out in front of you.
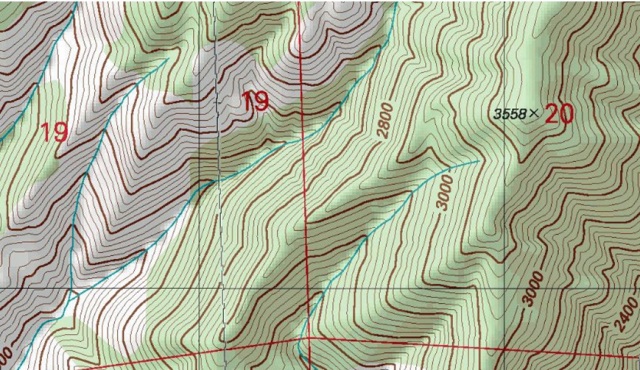
Topographical maps show various features such as rivers, lakes, trails, and roads. Topo maps also identify terrain and elevation with the use of contour lines. A contour line is a line on a map that has the same elevation the entire length of that line. If you cross over contour lines you are either gaining or losing elevation. If you notice every fifth line on the map is visibly darker. This line is called the Index contour line. This line usually represents 200 ft in elevation gain or loss on the map. The spacing between contour lines determines how steep or change in elevation for that area. The closer the contour lines the steeper the terrain, the further apart the “flatter” the area.
Now that you have an idea of what all of the different features are, what type of terrain features are you looking for? The main features that I am looking for are water sources, ridge lines, saddles, benches, valley’s, and draws. I will explain each of these separate.
Water source- This is usually represented with the color blue on the map. It can be a line representing a river or stream, or take the shape of a lake or small pond. I have learned that just because it is on the map doesn’t mean that the high mountain stream or spring will be there this fall. I know of several springs that will dry up come fall. Just a word of caution.
Peak 1– is the areas of high ground were all surrounding ground loses elevation in every direction.
Ridgeline 2– is a primary line of high ground often connecting one peak to another.
Saddle 3– is a low point between two areas of higher elevation. A saddle is most easily identified as a low spot between two peaks. A saddle can also be found as a low spot on a ridgeline. On a map a saddle will often form an hour glass shape with the contour lines. A saddle is used as a access point from one drainage to another.
Valley 4– is a large stretch of low land between two ridge lines. Valleys are usually formed by some form of water way located in the bottom of the valley. A valley usually has some sort of water source located in the bottom of the valley. These areas can be magnets to big game animals because of the available water and feed located within them.
Bench 5– is a relatively flat area that can be found on a ridge. A ridge will gain in elevation and then flatten out forming a bench. A bench can also be found midway up the side of a ridge. A bench is a great place for animals to bed during the day. A bench can be several acres in size or they can be as small as a pickup truck.
Draw 6– is similar to a valley but is much smaller. They are often located on the side of a ridgeline and will move up the ridge to form a saddle. These areas can be great corridors for animal movement from one area to another.
Learning and using a topo map is a skill that takes time to develop. It is also a skill that needs to be learned to help you in your future hunting endeavors. They are a great tool to help put one more piece in the puzzle together in finding that dream buck or bull this coming fall. The best way to learn is to get a map and get out in the area covered on the map. You will start to see just how all the information laid out on the map starts to come together. Next month I will try and explain how to put all of that information together to find that buck or bull of your dreams this coming fall. Until then I want to thank you for taking the time to read my recent blog post.
~
Thanks for reading! If you enjoyed this post please share it with the world!
Don’t forget you can read more articles from Tyler Henderson’s blog “The Idaho Bowhunter” here and don’t forget to like us on Facebook.
If you’d like to get immediate email notifications when a new article, contest or show is posted; enter your email address in the sign up box on the left.
Discover more from The HuntFishTravel Show
Subscribe to get the latest posts sent to your email.


Being an old Army Pathfinder, reading maps is second nature. Something that many today ignore due to technology. Sad, because once learned map reading can be a blast. Good post, keep it coming.