When I emailed Carrie Z my title for this month’s article, I hated it the second I hit send. I knew that, once I started writing, it would turn into 7 KEYS TO SHOOT BETTER NOW, OR 8 KEYS OR 9 KEYS, ETC, ETC, ETC. There are just too many variables to shooting a bow properly to narrow them down to a certain number. But we have to start somewhere and I think these 5 will get us well on our way to better shooting.
One of MERRIAM-WEBSTER’s definitions of discipline is, “A WAY OF BEHAVING THAT SHOWS A WILLINGNESS TO OBEY RULES OR ORDERS”. Experiments have shown that if you place a bow, perfectly tuned or completely out of tune, in a shooting machine, it will pretty much shoot the same arrow into the same hole time and time again. I don’t personally have a shooting machine and have never conducted such experiments, but for the sake of argument, lets say this is true. The reason a machine can accomplish this is it executes the shot in the exact same manner over and over again. It obeys the same order, every single time. Next month I’m going to discuss developing a Shot Sequence. This will help establish an order for us to follow on each shot. Before we can set a sequence for each shot, however, we need to make sure we are executing each element of the shot to the best of our ability. While we can never hope to duplicate the results of a shooting machine, we can make it our goal to try to get as close as humanely possible. The following are some key areas we should focus on.
 GRIP
GRIP
As I just stated, a bow, by itself, in a controlled environment, will shoot consistently time and time again. The problem is we have to add a crazy, unpredictable element to make the bow function…OURSELVES.
I can barely walk and chew gum at the same time and usually trip trying to do that. The only way we can ever hope to accomplish a consistent, well executed, shot is to work on each phase of the shot sequence until it is ingrained in our sub-conscious mind.
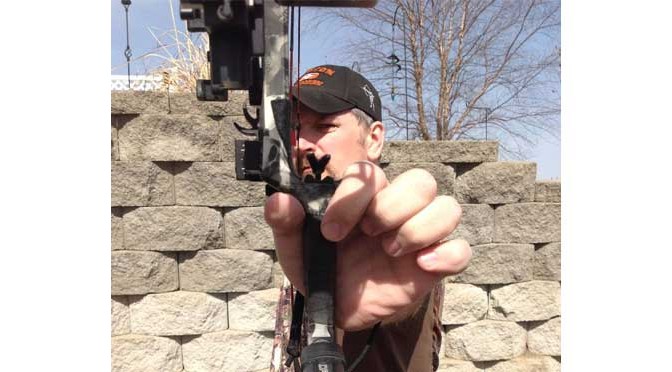
 Our first and, arguably, most crucial, point of contact with the bow, and one very few people give much thought to, is our grip. The term grip is a horrible name because gripping the bow is the last thing we should be doing. Any contact we make with the sides of the bow will cause torque which will lead to errant shots. Now, full disclosure, if you can torque the bow the exact same way every single time you shoot it, by all means, grip it and rip it. However, I believe this is difficult to accomplish and with everything else we have to worry about when trying to execute a good shot, why not try to take any unnecessary problems out of the equation?
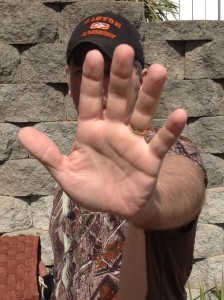
 Our goal should be to take as much of our hand off the bow as we can. To do this, you should hold your hand up in front of you like your telling someone to stop. The bow should then fit somewhere along your lifeline or more to the thumb side of your hand. I like to follow my thumb down into the fatty pad at its base and then find the bone there. I place my bow grip right on that bone. I now have minimal contact with my bow, I’m not touching the sides in any way, thus eliminated torque, AND I have a reference point so I can duplicate my hand placement shot after shot.
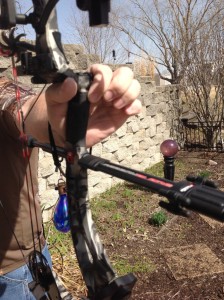
If you’re not used to “gripping” a bow like this it will feel awkward at first, but it will eventually start to feel natural. There are many benefits to placing your hand on a bow this way. As I’ve already mentioned it eliminates torque, It’s repeatable and it actually moves your bow arm away from the string so you won’t have to worry about it hitting your arm. I’ve also found that my sight is pretty much level when I get to full draw if I’m on relatively flat ground. I’m not having to twist the bow (more torque) to level my sight bubble.
[Tweet “A proper grip is a key element to shooting better. @JackGibson67 #archery”]You should also start using a wrist sling if you’re not already. Make sure the sling is tight enough to keep the bow from flying out of your hands, but not so tight as to cause torque. A good rule of thumb is to be able to get your fingers under it when holding up the bow. Our goal is to let the bow jump forward naturally and not grab it at the shot. Your bow hand should be relaxed. Not holding on to the bow and not rigid and upright in the STOP position. When I started to get serious about shooting I knew one of my problems was grabbing my bow when I shot it. High speed cameras have shown we can grab our bows fast enough to affect arrow flight. I spent hundreds of shots right in front of a bale shooting while consciously not grabbing my bow. I knew I had overcome my bad habit when my brand new Hoyt Pro Elite with a red flame paint job finally came in at my local pro shop. I’d waited on this bow for weeks. The shop was relatively full and I was a big shot among these lowly guys with their camo hunting bows when I pulled the shiny target bow out of the box. I couldn’t wait to try it out and wanted to show it off in front of the crowd, so I slapped a safe draw on it, which is a device that allows you to dry fire your bow. Without a wrist sling, I drew back and fired my brand new bow across the archery shop. Hey, my grabbing problem was obviously fixed!
ANCHOR
Anchor points are basically check points that make sure you are drawing the bow to the exact same place on your face every time. They usually consist of where you place your release hand on your face, where the string falls across your face and your peep sight (if you use one) in relation to your sight housing.
I use an index finger release right now and I like to place my index finger knuckle in the “hole” right behind my ear lobe. You could place this knuckle right on your ear lobe. It really doesn’t matter what your point of reference is, as long as it’s in the same place each and every shot. When I shot a handheld style release, I placed the gap between my index finger knuckle and middle finger knuckle on the point at the back of my jaw. Find a spot you can hit every time comfortably and go with it. If you don’t you will have a tendency to float away from your face ever so slightly which will cause left and right misses.
A second anchor point is usually the tip of your nose. You should attempt to set your draw length where you can place the tip of your nose on the string without having to move your head too much. Without this you can, again, move your head around which throws off your rear sight causing you to miss in any direction.
A third anchor point should be centering your sight housing inside your peep sight. Most sights are made with a round sight housing and most have a fluorescent ring around them for just this purpose. A good rule of thumb when initially setting up your peep sight is to think about what your average shot will be and set your height at that distance. Here’s an example: let’s say you are a 3D shooter and your average shot on most ranges is around 35 yards. When setting up your peep, get 35 yards from the target, draw your bow and anchor with your eyes closed. Now open them. Is your sight housing centered in your peep sight? If not, set it so that it is. I like to buy peep sights where I can change the size of my aperture. This way I can find the one that is perfect for my set up.
Find yourself 2 or 3 solid anchor points and make sure you hit them every single shot. Your shooting will improve immediately.
AIM
[Tweet “Practice aiming your bow to get better. @JackGibson67 #archery”]Have you ever given any thought to how you aim? What if I told you that you can practice aiming and actually get better at it? I learned this from my friend and mentor PSE professional archer Michael Braden from Texas. He calls them aiming drills. He’s does several of these when he’s practicing before he ever releases an arrow. It helps him to train his mind to aim and actually hold his pin on the target steadier.
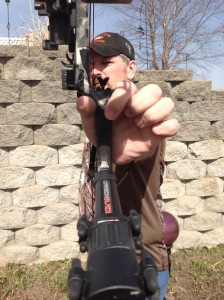
To do an aiming drill, get whatever distance you want away from the target. I’d start out closer, say 20 yards, but the further you get away, the better you can work on this. Set a timer on your watch for around 25 to 30 seconds. Start the timer then draw your bow and come to anchor. Go threw all the motions just like you were going to shoot the shot, even have your finger on the trigger. However, just put the pin on your target and hold it there until the timer goes off. Then, take your finger off the trigger, let down you bow, let your muscles recover and repeat the process 4 or 5 times. How steady were you? If you were all over the place it could be a sign of incorrect draw length, too much bow weight, or it could show you that you are basically a drive by shooter who never really focused on aiming at all. Now, don’t get me wrong, we can’t hold a pin perfectly steady, but we shouldn’t be bouncing on and off the target either. At worst we should be doing slow figure eights around the bullseye. If you have a way of attaching a laser to your bow, you can find out a lot about how steady you hold by watching the laser on your target.
If you’ve never practiced aiming, give it a shot.
RELEASE
This is a tough one for me to describe because most people shoot hair trigger release aids. The reason most people shoot them is that’s the way most release aids come. I think this causes all sorts of problems.
The mind is incredible! It can do millions of things subconsciously, but only one thing consciously. When it comes to shooting a bow, that one thing should be aiming. When we have to take our minds off aiming for that split second it takes to think about touching our finger to our touchy release aid, our sight pin could have moved several inches.
The solution to this is either learn to shoot a hinge style release, which most don’t like in hunting situations because it forces them to give up the “control” they get with a trigger or spend more money on a release with an adjustable trigger pull. I’m talking pounds here, not ounces and these releases are going to cost $150 and up. Most people are going to skip over this part and, because of the expense, I don’t blame you. But, in order to have a surprise release while aiming, we have to be able to wrap our fingers around the release (not just touch it with the end of our finger), apply some pressure to the trigger (basically attach our release arm to it), and pull threw the shot. It’s the best way to consciously aim, while subconsciously pulling through the shot till your bow fires. Again, if people request it, I might go in depth on this in another article, but for now, I’ll just emphasis pushing your pin into the target while pulling through the shot.
FOLLOW THROUGH
[Tweet “We are results driven. @JackGibson67 #archery”]We are results driven. We want to know immediately where our arrows have hit on the target. Because of this, we have a tendency to peek, or move the bow out of the way in order to see where our arrow is going. Believe it or not, we can start to do this early enough to affect our arrow flight.
When I talked about aiming earlier, I talked about holding the pin steady on the target. However, there comes a point in the aiming process where we need to look past the pin (you’ll still see a blurry pin in your peripheral vision) and focus hard on the spot we want to hit. Michael likes to say “burn a hole” in that spot. When you do this, this should trigger you to pull harder, thus firing your release. Train yourself to keep watching that spot until you see the arrow in it.
Follow through is simply holding the natural reaction your body has to firing a bow for a few seconds after the shot. Your bow arm should go straight forward or slightly left for right handed shooters and your release hand should go straight back slightly. If your release hand stays still, your are only punching the trigger and not pulling through your shot. If your release hand goes flying back wildly, you are forcing the release and pulling too strongly. A good follow through will help make sure the arrow clears the bow cleanly and shows that you are focusing on where you want that arrow to hit.
CONCLUSION
The ending of the title for this article says (well…almost). The reason I put that there is you probably WON’T shoot better now. Any time you change something, even if it’s for the better, you will probably shoot worse for a while until you learn how to properly execute each element of your new shooting style. Don’t get discouraged! Unless your satisfied with the way you’ve been shooting, you can learn to shoot better! That’s what I love about this sport. No matter your physical abilities, you can achieve the highest levels if you put your mind to it! Don’t believe me? As I’m putting the finishes touches on this article, Indoor Nationals in LouisvilleKentucky is just finishing up. Eight professional archers shot a perfect 600 120X score to make it to the shoot off. Included in those eight is Matt Stutzman, the “Inspirational Archer”. Matt has no arms. His grip is between his big toe and 1st toe. His release is with his teeth! Google Matt or look him up on YouTube to be inspired!
Shoot straight and above all, HAVE FUN!!!
Jack

Thanks for giving the valuable information with us.