Smoke’m If You Got’m: Taking the Anxiety out of Maintaining your Muzzle Loader

Wild Ones Blogger – Fay Walker - Fay-vorite PastimesNorth Florida       COORDINATES XY: Anywhere, Florida

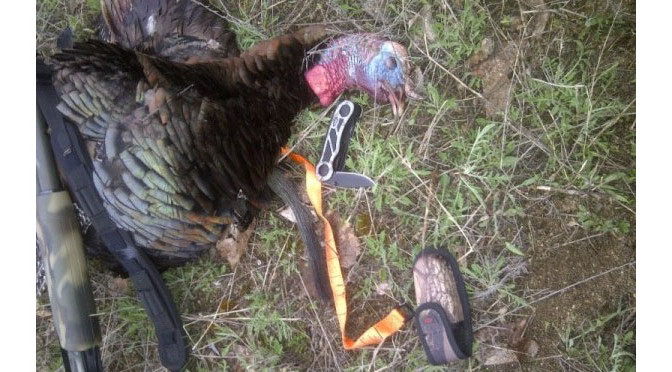
I have noticed that it is not uncommon for women to act a bit shy of firing the muzzle loader (black powder). The kick-back; the smoke; the maintenance, and the effort it takes to reload can be a bit intimidating. While my preference is to hunt primitive, I must admit that I will continue to hunt with quiver and bow long into muzzle loader season. Why – because I do not want to be bothered with all the little details associated with firing black powder.

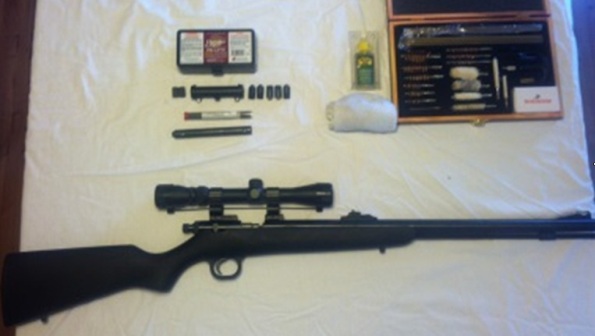
This being said, and all things being fair, I do own a Knight Muzzle loader. While it isn’t the latest trend item, it is affordable; accurate, and does not require a “Daniel Boone” style approach to reloading.  Still, I tend to reach past the Knight in favor of my bow because of the level of comfort I have with it.

The difference between the conventional rifle and the muzzle loader is all in how one loads the ammo.  A muzzle loader requires that black powder or pellets be loaded separately from the bullet.  The resulting smoke after firing is also a unique characteristic of all muzzle loading weapons. Other differences include a more detailed approach to cleaning your weapon, which is necessary because of the powder residue left within the barrel after firing. This residue can quickly build up and unless you regularly maintain your weapons, rust will quickly follow.

Let’s try to remove some of the mystery of muzzle loader maintenance by following some simple guidelines. Be sure to purchase a few items before you begin. Having these products handy will make the experience less tedious and frustrating.

Grocery list:

  • Universal gun cleaning kit (or a kit exclusive to your weapon of choice)
  • Extra cleaning patches
  • Allen wrench (assortment or one that can be used for disassembly)
  • Bore Butter or rust preventative product
  • Patch solvent and bore cleaner
  • Never-Seez (for parts that are threaded – ex: breach plug)
  • Dishwashing soap and warm water handy
  • Q-tips (just a couple will do)

Let’s take a look at the Knight Muzzle Loader. The Knight Muzzle loader is an “in-line” design which means that the striker and trigger are lined up with the primer cap, and barrel. You can use these procedures for any of your in-line weapons regardless of the design.


Select an allen wrench that fits the screw under the stock of the gun. Remove the gun stock.
Use the allen wrench to remove the trigger assembly. Be sure to keep all of your parts organized to ensure an easy reassembly.
Unscrew the bolt and remove.
Use the nipple wrench to slide into the barrel and remove the nipple and the breach plug.
Illustration of wrench – nipple removal.
Illustration of wrench – Use the other end of the wrench to remove the breach Plug.
Bore brushes come in various sizes and styles. Be sure to select one that fits the size of the barrel. A universal gun cleaning kit should have everything you will need for most gun cleaning projects.
Screw the appropriate bore brush onto the cleaning rod and apply bore cleaner before running down the interior of the barrel. This loosens up the residue build up.
Use Slick Load or other bore cleaner product to coat the cleaning patches
Use Slick Load or other bore cleaner product to coat the cleaning patches.
Thread the prepared cleaning patch into the cleaning jag and scrub the interior of the barrel. This may have to be done several times before the residue will begin to break free.
Illustration of how to thread the cleaning patches onto the cleaning jag.
As you can see – gun care is all important. This is a combination of rust, and black powder residue. To minimize rust build up, be sure that the barrel is completely dry and coated with bore butter before reassembly.
When the barrel has been removed of most of the residue, you can attach this bore swab for the next step.
Fill a tall cup with warm soapy water. Place the barrel in the cup and scrub the interior of the barrel with the bore swab. The soft brush will pull the suds up into the barrel and remove any stubborn residue that may be left.
Raise the barrel to the light to make sure that the barrel is clean. Repeat the last step if you still see a little residue left over. Then use the cleaning patches to dry the interior. This may take several patches and several attempts. Even when you think it is dry, it may not be. Remember this is the primary cause of rust.
Illustration of cleaning patches used to dry the barrel’s interior. The bore jag is great for pushing the patches through the barrel.
All barrels need a little lube. For this project, we are using Slick Load barrel lube.  Place some on a cleaning patch and swab the barrel to ensure it is protected against rust and corrosion.
All barrels need a little lube. For this project, we are using Slick Load barrel lube.
Place some on a cleaning patch and swab the barrel to ensure it is protected against rust and corrosion.
For the final phase of this project, we want to make sure that future maintenance occurs with minimal fuss.  Before you return the nipple and the breach plug, be sure to coat the threads with Never-Seez. This product prevents threaded parts from seizing up over time due to rust.
For the final phase of this project, we want to make sure that future maintenance occurs with minimal fuss. Before you return the nipple and the breach plug, be sure to coat the threads with Never-Seez. This product prevents threaded parts from seizing up over time due to rust.
Use the wrench to return the lubricated breach plug and nipple.
Now that all of the hard work is done, in reverse order re-install the: •Bolt • Trigger assembly •Gun Stock Be sure to wipe down your weapon before returning it to its secure location. Finger prints can and do cause corrosion.
Now that all of the hard work is done, in reverse order re-install the:
• Bolt
• Trigger assembly
• Gun Stock
Be sure to wipe down your weapon before returning it to its secure location. Finger prints can and do cause corrosion.

After reassembly, you are ready to fire or store your weapon until next time. Thanks to my good friend and hunting buddy, Jeff for cleaning my weapon and educating me on all the important details of gun care. This article could not have been written without you!

If you liked this article, be sure to tune in for the next publication: How to site in your scope, another common complaint from the outdoor woman.

~
Thanks for reading! If you enjoyed this post please share it with the world!

Don’t forget you can read more articles from Fay Walker’s blog “Fay-vorite Pastimes” here and don’t forget to like us on Facebook.

If you’d like to get immediate email notifications when a new article, contest or show is posted; enter your email address in the sign up box on the left.

hits counter

click tracking

Leave a Reply

Your email address will not be published. Required fields are marked *

Sign up for the HuntFishTravel Newsletter!

Also, just so you know: I respect your privacy and will not share your personal information with third parties or partners. You and I are buds, and buds don’t share personal info!